(for a Mac)
This file is more a set of instructions than a description. But in brief Audacity allows a trainer to
1) listen asynchronously to both interpreting and source speech at the same time and
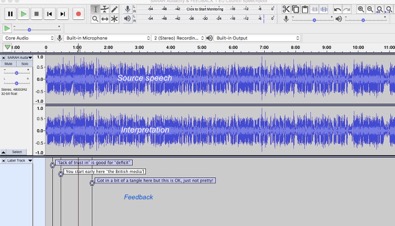
2) add feedback into the same file, with the feedback directly associated to the part of the interpreting in refers to.
There are two stages to get you to a dual track (both source speech and the interpreting in a single recording).
- 1. Convert Youtube speeches to MP3
- 2. Record interpreting over the original speech as a second track.
Convert Youtube speeches to MP3
1. Go to your Youtube film and copy the URL
2. Go to https://ymp4.download
3. Paste the Youtube film URL and click on the format you want (eg. MP3 320kbps)
4. Click „download” and then again on the new green “download” button that will appear
5. The downloaded MP3 file will appear in your Downloads folder
Record interpreting over the original speech as a second track
Download, install and open Audacity.
To interpret
2. Drag and drop MP3 file of source speech into Audacity window.
3. Click on Tracks menu
4. Choose Add new
Stereo track
(Put the microphone volume up high and speaker volume relatively low. These are both underneath the green play button)
5. Press red record button to start interpreting
6. Stop interpreting
7. File/ Export
Teacher, to listen and give feedback.
Feedback in the audio recording
9. Click on Tracks menu
10. Choose Add new
Label track
11. Click the part of the recording to which the feedback comment relates
12. To add a new label
Edit Menu
Labels
Label at selection
click where you want to add a comment
type text into box provided
13. Repeat 12 for each feedback comment.
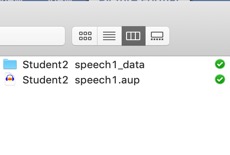
14. Save project as an Audacity .au file
– Once you record the “project” you can still edit the feedback The result looks like this:
Sending the project to a student
You need to send both the .au file and the _data folder of the same name (eg. Peter.au & Peter_data) for the student to be able to open the file at the other end. It’s a very big file! When they open the .au file it must inside the same folder as the _data folder.
15. To compress the file and folder into a zip file
Mark the file and folder and (ctrl + click) or (right click) on them. Choose “compress”. A .zip file will be created
16. Share the .zip file with your student… eg. via Gdocs
(It’s a very big file… approx 130MB for 10min speech)
When you play back the project you might not immediately see your feedback as it is later down the folder.
NB. My limited experience when listening with Audacity is that it pushes us towards very detailed micro-commentary. So it is well worth listening to the interpreting again as a whole, almost ignoring the original, to get that overall impression back.